Frame Like a Storyteller: Composition Secrets to Transform Your Photos
A powerful photo doesn’t just happen—it’s composed, sculpted from light, lines, and intention. Whether you’re shooting on a phone or a full-frame camera, composition is the secret language that guides your viewer’s eye and fuels emotion. On SnapFresco, we’re all about turning everyday moments into visual stories, and composition is your most loyal co-writer.
Let’s dive into practical, creative composition tips that you can try today—complete with camera settings, technique breakdowns, and exercises designed to shake you out of autopilot and into artistry.
---
See Before You Shoot: Training Your Photographer’s Eye
Before you touch the shutter, train yourself to *see* like a photographer. Composition begins long before you raise the camera to your face.
Pause for a moment and scan the scene: where does your eye go first? What’s the most interesting shape, contrast, or gesture? Imagine a frame around that moment—if you could only capture a slice of what you see, what would you choose?
Try this pre-shot checklist:
- **Subject**: What is this photo *about*? A person, a pattern, a mood, a color?
- **Background**: Is it distracting or supporting the subject?
- **Light**: Where is it coming from, and how is it shaping your scene?
- **Story**: What feeling or idea do you want your viewer to take away?
This habit turns snapshots into intentional images, no matter your gear. When in doubt, ask: *If I could remove one thing from this frame, what would it be?* Then reframe until only the essentials remain.
---
Rule of Thirds, Then Break It: Building Strong Foundations
The rule of thirds is a simple grid that can radically improve your compositions. Imagine your frame split into nine equal rectangles by two horizontal and two vertical lines. The intersections are visual “hotspots” where the eye naturally lingers.
- Place a **horizon** along the top or bottom third, not dead center.
- Position a **person’s eyes** near an upper intersection.
- Set your **main subject** (a tree, a building, a plate of food) off-center on a vertical third.
On many cameras and phones, you can enable a grid overlay in the menu or settings. As a starting point:
- **Camera mode**: Aperture Priority (A/Av) for control over depth-of-field
- **Aperture**: f/2.8–f/5.6 for portraits and details; f/8–f/11 for landscapes
- **ISO**: 100–400 in bright light; 800–1600 in low light (adjust to keep shutter speed reasonable)
- **Focus point**: Move your focus point to your subject on a third, instead of focusing center and recomposing every time
Once you’re comfortable, start breaking this rule. Center your subject for a symmetrical, powerful feel. Push them to an edge for tension. The rule of thirds is a springboard, not a cage.
**Exercise:**
Shoot the same scene three ways:
1. Subject perfectly centered.
2. Subject on a rule-of-thirds intersection.
3. Subject pushed to the far left or right edge.
Compare how each image feels. Which one tells the strongest story?
---
Lines, Shapes, and Flow: Directing the Viewer’s Eye
Good composition is like choreography—you’re leading the viewer’s eye through the frame. Lines, shapes, and curves are your invisible arrows.
Use Leading Lines
Leading lines are elements that guide the eye toward your subject or deeper into the scene:
- Roads, fences, shorelines
- Handrails, bridges, staircases
- Shadows, rows of trees, architectural edges
For strong impact:
- **Camera mode**: Aperture Priority
- **Aperture**: f/8–f/11 to keep more of the line in focus
- **Focus**: On the area where you want the eye to land (often your subject)
- **Focal length**: 24–35mm (full-frame) or your phone’s main lens for a more natural perspective
Try placing the line so it starts near a corner and flows toward your subject. Diagonal lines usually feel more dynamic than horizontal ones.
Play With Shapes and Negative Space
Look for bold shapes—triangles formed by light and shadow, circles like windows and plates, rectangles made by door frames. Arrange them so they interact in a pleasing or provocative way.
Negative space (empty areas like sky, wall, floor, or blur) can:
- Emphasize isolation or calm
- Make a tiny subject feel important
- Give your viewer room to breathe
**Exercise:**
In your home or neighborhood, create a 10-shot series focused only on lines. No faces, no text—just lines leading somewhere. Review them and notice which angles feel calm, and which feel energetic or tense.
---
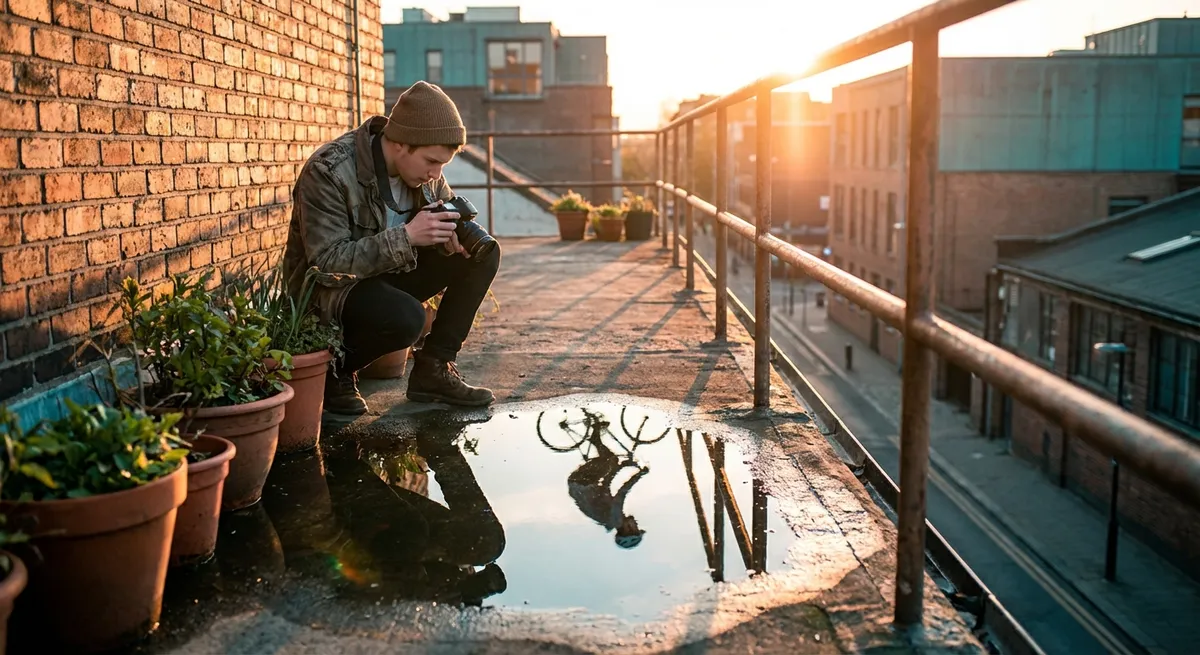
Depth and Layers: Turn Flat Scenes Into Cinematic Frames
A flat-looking image usually lacks layers. To add depth, think foreground, midground, background—three acts to your visual story.
Build a Three-Layer Frame
- **Foreground**: Objects close to the lens—foliage, a railing, a shoulder, a window frame.
- **Midground**: Your main subject.
- **Background**: Context—buildings, mountains, a city street, a distant crowd.
Set up like this:
- **Camera mode**: Aperture Priority
- **Aperture**:
- Portraits: f/1.8–f/4 to blur foreground and background slightly, making the subject pop
- Environmental scenes: f/5.6–f/11 to keep more layers in focus
- **Focus**: Always on your main subject
- **Focal length**:
- 35mm–50mm full-frame (or phone main lens) for a natural look
- 70mm–85mm for more compression and background blur on portraits
Physically move: crouch behind plants, shoot through windows, frame your subject between doorways or people walking by. Even on a phone, getting closer to a foreground element can create pleasing depth.
**Exercise:**
Pick a busy location—a café, street corner, park bench. For 15–20 minutes, only shoot images that have all three layers. Use people, chairs, trees, or signs to build your depth. Notice how much more immersive the images feel.
---
Light as a Compositional Tool: Shape, Contrast, and Mood
Composition isn’t only where things are placed; it’s how light carves them out of the scene. Contrast and brightness guide attention just as strongly as lines and color.
Side Light and Directional Light
Side light (from a window or low sun) creates shapes, shadows, and texture. Position your subject so the light hits from the side or slightly behind for drama.
- **Camera mode**: Manual or Aperture Priority
- **Aperture**: f/2.8–f/5.6 for portraits; f/5.6–f/8 for scenes
- **ISO**: Start at 100–400, increase if shutter speed drops below 1/60 hand-held
- **Metering mode**: Spot or center-weighted on your subject’s face or key area
- **Exposure compensation**: Try -0.3 to -1.0 in very bright, contrasty light to protect highlights
Use patches of light like stage spots—placing your subject where the light falls naturally creates instant compositional focus.
Silhouettes and High Contrast
Use strong backlight (sunset, bright windows) to create silhouettes. They simplify forms into pure shape and gesture.
- **Camera mode**: Manual or Aperture Priority
- **Aperture**: f/5.6–f/8
- **ISO**: 100–400
- **Metering**: Expose for the bright sky or window, not the subject
- **Result**: Background properly exposed, subject becomes a dark, graphic shape
**Exercise:**
At golden hour, find a location where the sun is low and strong—behind people, trees, or buildings. Shoot 10 silhouettes and experiment with where you place the dark shape in the frame: centered, along a third, or very small in a huge sky.
---
People and Portraits: Composing Emotion, Not Just Faces
Portrait composition is about connection. The way you frame someone communicates how you want the viewer to feel about them.
Frame for Connection
- Keep **eyes** near the top third of the frame; we instinctively look for them.
- Leave **look room**—space in front of where they’re looking rather than behind their head.
- Watch **limbs and edges**—avoid cutting off hands, feet, or joints at awkward places like wrists, knees, or chins.
- Use **backgrounds that support the story**: a chef in a kitchen, a musician in a rehearsal space, a reader near a window.
For compelling portraits:
- **Camera mode**: Aperture Priority
- **Aperture**: f/1.8–f/2.8 for close-ups; f/3.5–f/5.6 for environmental portraits
- **Shutter speed**: Aim for 1/125–1/250 or faster to avoid motion blur
- **ISO**: Adjust to maintain that shutter speed (400–1600 indoors)
- **Focus mode**: Single-point AF on the eye closest to camera; use Eye AF if available
Environmental Storytelling
Don’t always fill the frame with the face. Step back and use composition to show where they are and what they love. Place them small in a big scene to show scale; off to the side to reveal surroundings.
**Exercise:**
Photograph one person in three ways:
1. Tight headshot (eyes on top third).
2. Half-body portrait with a supporting background.
3. Tiny figure in a large environment.
Lay them out side by side and see how the story shifts with composition alone.
---
Creative Constraints: Exercises to Unlock Your Style
Constraints are fuel for creativity. Use these exercises to push your composition skills beyond habit.
1. The One Lens (or Focal Length) Day
Pick one focal length (or your phone’s main camera) and stick to it for an entire day.
- If you have a zoom: tape the zoom ring at 35mm or 50mm equivalent.
- If you have a prime lens, that’s perfect.
This forces you to move your body, explore angles, and work harder on composition instead of relying on zoom.
2. The Color Story
Choose a single color—red, yellow, blue—and build a mini photo series based around it.
- Compose to feature that color strongly.
- Use negative space and repetition (e.g., three red objects spaced across the frame).
- Shoot both close-ups and wide scenes.
This trains your eye to notice patterns and harmonies, making your compositions more intentional.
3. The 9-Frame Grid Story
Tell a story in exactly nine frames:
- Frame 1–3: Establish the scene (wide shots, context).
- Frame 4–6: Details and mid-level compositions (hands, tools, textures).
- Frame 7–9: Intimate moments or interesting angles (close-ups, silhouettes, abstract views).
Arrange them later as a 3×3 grid. Notice how variety in composition—wide vs. tight, centered vs. off-center—creates rhythm and narrative flow.
---
Conclusion
Composition is where your vision becomes visible. It’s not about memorizing rules; it’s about learning the visual grammar so you can speak fluently—and then poetically. With every frame you shoot, you’re making choices about where to place lines, light, people, and space.
Let your camera settings support your vision: use aperture to guide attention, shutter speed to freeze or suggest motion, and ISO to keep your images clean but flexible. Most of all, keep experimenting. Move your feet, change your angle, frame through things, and dare to leave plenty of empty space.
Your next unforgettable image is already out there, waiting for you to compose it into existence. Step into the world with intention, and let every frame you make be a small, bold act of storytelling.
---
Sources
- [Nikon Learn & Explore – Composition Basics](https://www.nikonusa.com/en/learn-and-explore/a/tips-and-techniques/three-basics-for-better-composition.html) - Overview of foundational composition principles like rule of thirds and leading lines
- [Canon USA – Understanding Depth of Field](https://www.usa.canon.com/support/photography-education/understanding-depth-of-field) - Clear explanation of how aperture affects depth, layers, and subject separation
- [Harvard University – Light as a Visual Element](https://projects.iq.harvard.edu/culturalagents/files/light_as_visual_element.pdf) - Discusses how light and contrast influence visual perception and impact
- [National Park Service – Photography: Composing the Scene](https://www.nps.gov/articles/photography-composition.htm) - Practical advice on composing landscapes with foreground, midground, and background
- [BBC – How to Take Better Portrait Photos](https://www.bbc.co.uk/news/resources/idt-sh/how_to_take_better_portrait_photos) - Portrait-focused composition tips including framing, backgrounds, and eye placement